Sunday, May 1, 2011

Linen & Lace Shabby Chic home decor collection

Here are some of my latest creations. The little wee cottages are wonderful decorations nestled among vintage pieces or house plants.


Little Linen houses


Some other wonderful linen and lace items found browsing on Etsy

 
Sweet little linen baby shoes by BobkaBaby 


Linen storage bucket by Tuuni's Etsy Shop

 Nest in the Attic's Shop has this wee little pin cushion:


Sunday, April 17, 2011

Before & After Projects

 Before: Inexpensive sweaters from the second hand store. Both of these sweaters are 100% wool and felted up very nicely. Curious how to felt sweaters? Check out my previous post.


The green one I have yet to do anything with. The pink one is from Old Navy, who seem to put out a batch of fun bright striped sweaters every year. I've bought a few and also some great ones made by The Gap.  The pink and brown one was so pretty that I decided it would make some nice spring stuffed bunnies. The pink and the brown are both soft subtle colors.  I have been putting little pockets on the front of all my stuffies for a while now and they have been a huge hit. All kids need a place to keep their secret treasures! I made these like siblings - similar but slightly different so they could be distinguished if bought together.  


After:  Sweet little spring bunny rabbits. Hand embroidered faces with felt scrap eyes.   Nice and plump and squishy soft.


Before: Some fantastic fabric I bought on a whim with no project in mind (shame on me, you should see all the fabric I have!!).  The woodgrain or Faux Bois (from the French for false wood) in bark brown by Joel Dewberry for Free Spirit Fabric.  


The other fabric is a fantastic print called Heath in chocolate brown by Alexander Henry. It has a hand printed look with just enough variation to make it interesting. It's even better up close. Just love it. Actually been looking for other projects to use it one.


After:
A page for my most recent fabric baby book. These little books are all fabric so they are soft and quiet and great for those times when you need to keep baby entertained.


Here is one last project. I purchased a linen skirt at the 2nd hand store last summer. It was an Eileen Fisher so it was super long. I hemmed it to knee length and it fits great. I was left with a large scrap piece of linen which I have used in several different projects.


This wee little house is just tiny - about 4 1/2" tall and 2" wide. I hand sewed the entire thing, trimmed it with blanket stitch along the edges, used some scrap wool for the roof and bottom and then hand embroidered windows, a front door and tons of flowers. It was actually too sunny in my studio today when I took these. I haven't decided yet if this will go in my Etsy Shop or to work with me this week to sit with the array of little plants I have growing. I was actually considering making an entire little village.  

Thanks for stopping by!
Jennifer -

Monday, August 9, 2010

Free Sewing Pattern and Instructions DIY Waterproof Wet Bag for swim suits


Free Sewing Pattern and Instructions for making a PUL Fabric Drawstring waterproof Wet Bag

My kids start camp this week and will be swimming every day. To avoid a mess the wet swim suits and towels will create, I decided to sew up some quick drawstring wet bags. These bags can have many uses - great for trash in the car, soiled clothes from preschool or daycare, wet diapers, etc. This bag is finished with a drawstring closure at the top, but you could just as easily use a strip of sewn on Velcro.

This makes a generous sized bag and you can of course scale the size down to whatever works for you.

Materials:
Outside Fabric (red hippo fabric is from IKEA by the yard)
PUL Fabric for lining (waterproof fabric - more about PUL at Celtic Cloths and here as well)
drawstring (ribbon, cord, shoelace, etc.)
coordinating thread

Instructions:

1. cut both pieces of fabric to size: 24" x 18"


2. lay fabrics wrong sides together - shiny side of the PUL facing up and focus fabric facing down. Pin pieces together and sew an 1/8th of an inch around to secure the two pieces together. This step is important because the PUL fabric is very slippery and otherwise the fabric slips.


3. To start, fold down the top corners at a 45 degree angle and pin in place. This will create a hem for the drawstring. Lie the project flat and turn in each corner - sew in place.


4. Turn the top edge of the project down 1/4" and then fold again a full inch. Stitch in place creating a tunnel for the drawstring closure.


5. Here is the top hem completed:


6. Fold the project in half right sides together and pin in place. Sew along the side edge. If your sewing machine has difficulty with the PUL fabric (feed dog getting stuck), you can cut two small strips of tissue paper and lay them on either side of the fabric. Then just sew right on top of the tissue. When you are done with the seam, just tear the tissue paper off.


7. Sew along the bottom edge starting from the folded edge. Now the bottom and sides are sewn and the top edge is complete.

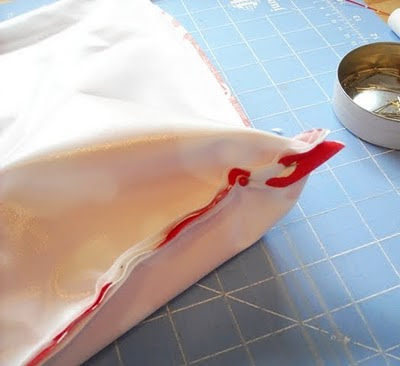
8. Now it's time to create the gusset at the bottom edge. Finger press the side seam open. Line up your seams on the outside by taking a pin and poking it through the side seam about 1 1/2" from the bottom.


Reach up inside the project to guide the pin from the inside of the side seam, out through the bottom....

9. Turn the project over and poke the needle through the bottom so it comes out right in the center of the bottom seam. Flatten out the sides and secure the pin in place.


Repeat with the other side: only this time you won't have a side seam to measure from. So you'll need to use your finger to flatten out the side to create a crease and then use that as the side seam, measuring and pinning into the side seam and through the center of the bottom seam.


10. Flatten the bottom out.


Now place the project on your cutting mat and measure 2 1/2" from the tip. Mark with pen/pencil. Now sew across this line back stitching at the beginning and end.


11. Cut off the corner 1/4" from the sewn line. Repeat with the other side


12. Here is what it should look like with both side gussets built:


13. Clip all stray threads, and turn project right side out. Here is how your gusseted bottom should look:


14. Now it's time to string the drawstring around the top. You can use a shoelace, ribbon (heat seal by very quickly passing a lighter over the ends) or with a similar cord.


Secure a safety pin to the cord to help you guide it through (easier to grab hold of and you won't loose the end inside).

Tie the ends in a knot if you want.


Here is how it should look when complete:


Finished Size: 14" long by 11" wide:


Now lets get ready to swim!

Questions about these instructions? Please email me at woodponddesigns@gmail.com

Enjoy! Happy sewing
Jennifer -

Friday, July 16, 2010

Wood Pond Designs new world headquarters


We just finished unpacking from our household move. We were lucky enough to have a moving company who did all the heavy lifting. Now that the majority of the boxes are unpacked and things put in their new homes, I've had a chance to set up a spare bedroom for sewing and crafting. We've been calling it Wood Pond Designs New World Headquarters!

I love WPD new digs - it's a small bedroom on the 2nd floor of the house with two big windows side by side that overlook the backyard with several towering White Pine trees, a smaller Maple and a backyard filled with birds, gray squirrels, and chipmunks. Plus I can see the kids playing in the yard. Though usually, they are lurking around wanting to help create things.

In our other house, my crafting area was in the unfinished part of the daylight basement. It had concrete floors and even with the sunny windows, it was cold and always lacked a nice comfy feeling. However, it did have tons of space.

That in part was due to a HUGE table that my husband built. The top is an entire sheet of plywood (8 feet by 4 feet), that has been sanded and attached to sturdy 2x4 base. He built it so he could set up the race car track to play on, but then when I needed a work space, I commandeered it, much to the disappointment of my 5-year old son, who reminds me often that I 'stole' it from him!

The table takes up half the room, but it holds everything. There is plenty of space to spread things out and leave a mess (which I am prone to do, but try not to in the rest of the house to keep life harmonious). I have my sewing machine and bins of projects on one side along with little organizing bins for thread, needles, etc. and then I have my cutting mat on the other side with my laptop sometimes at one end (and the rest of the time, I drag it around the house). I have a small bureau where I store all my fabric (there's a lot!), and a closet for inventory. There are also several plastic storage bins with pull out drawers which are great for keeping stuff under the table.

The only draw back is the room is completely white, with white trim, and a shade, but no curtains. Unfortunately, I can't paint and I am a bit restricted to hanging too much on the walls, so I am thinking of fun ways to dress the room up with color. It's a mess at present, or I'd share a picture (maybe later). Also, I have my ironing board permanently set up, since I use it constantly while I'm sewing.

Here are some new projects I've created in the past week, since I got set up:


Now I just need a sign on the door! Here are some that might work:

A fun shabby chic sign from The Back Porch Shoppe:


Or maybe I'd customize one similar to this funny Man Cave sign from Go Jump In The Lake's Shop:


Until next time, happy crafting to you!

Jennifer -


Monday, June 14, 2010

Sea Life Etsy Kids Team Challenge for June - Come Vote!


Every month, the Etsy Kids Team has a fun challenge for our 700+ members to join in on. A theme is chosen by the previous month's winner. This month the them is "Sea Life" which was picked by last month's winner greengoat. Reefs, fish, shellfish, sea plants, sea mammals and birds, imaginary sea monsters and ship wrecks. WonBulleted Listders of the oceans and beach is our focus for this challenge, represented in original prints, applique, illustrations, paper-cuts, accessories, toys, deco, etc. It's a lot of fun. Come and vote here EtsyKids blog starting on Monday June 21st - Sunday, June 27th.


Or search Etsy using the key words: EKchallengejun10 to see all the entry's. The official VOTE takes place here: EtsyKids blog. The winner will be announced on Monday, June 28th


COME VOTE FOR THIS WOOD POND DESIGNS FISH!


Monday, May 31, 2010

Random assortment of forgotten and unfinished projects.

I love to create, and I love to create something new and exciting. I have loads of ideas. Sometimes, however, I start making something, loose interest, move on to something else and forget all about that cool new project. I found a bunch of these unfinished goodies just the other day.

I went looking for something in one of my storage bins, and found a random assortment of half finished and forgotten projects. I have quite a few of those sturdy blue totes - one with patterns and misc. sewing stuff, and one for Jumble Balls, another for plush critters and bunny rattles, and yet another with all my wool for making sweater critters, etc. In my search, I ended up finding a whole host of other things - mostly half-finished projects. I got a pile of stuff out and decided to see if I could finish them up and decide what to do with them.

I found a bunch of bottlecap pin cushions that I made last winter. These are a ton of fun to make and I gave a bunch as gifts. All you need is a bottle cap from a soda bottle, some scraps of fleece, embroidery floss, and a tiny bit of filling. It's a great way to work on your embroidery skills. I has some in my Etsy shop, but they weren't great sellers so I just let them expire. Now I have them hanging around. Maybe I should do a give-a-way.


I had a custom order a while back to create a passport case for a European Passport. The size was just a bit different from a US Passport, so I had to modify the pattern. I ended up with a few extra's and now I can't remember if these are the standard or European size! I'm trying to figure out if they can be used for something else, like to hold an mp3 player. Here are a few that are the correct size! The batik fabric are brand new and I thought they would be great for Dad's on Father's Day, graduates and teacher appreciate gifts as they are more masculine than the others I've made.


Then I found some little totes I made. I was teaching myself how to create a lining that could be folded over the top. One of these I now use as a bin for my fabric marking pens and other little essentials on my sewing table. They are a little bit wonky and uneven, but still usable. Not sure what to do with these either!

I also found these nifty sweater blocks I made. I cut 6 squares from upcycled felted sweaters and then sewed them together. I put a jingle bell inside one of them, but the sound is muffled from the stuffing, but the other one has a rattle inside and it sounds just fine. I was thinking if I put the jingle bell inside of something else, maybe a film canister (do those still exist?), or some other small washable container. I have a ton of beautiful and amazingly soft cashmere that I could use to make more of these. They would look really cute with little appliqued shapes.


Then there tons of Plush Fishes. I have been modifying my original pattern, and here are a few of the latest ones.


Last but not least is this very cool silver fabric plush robot. He doesn't have a face yet, but I created the pink satin heart and my 5 year old decided he should be called 'love bot'.

Maybe I'll force myself to finish some of these projects before I create anything else new and exciting. Good luck with that....