Sunday, February 7, 2016

Upholstery Fabric Sample Projects

Here are some totes, drawstring bags and zipper pouches I've made recently. Most of these totes will be donated to The Bag Share Project (the first one I may keep it came out so nice!).

This tote has long shoulder length handles and is made from two contrasting fabrics in gray cotton canvas on the bottom and a green linen/cotton blend on the top

Drawstring bags are so fun and quick to sew and are perfect for small fabric samples. These were created by turning the top right and left sides in slightly at an angle- about 1/4" on each side, sewing down, and then folding the top down about 2 inches and sewing in place to create a channel. Then the fabric is folded in half and sew down the side and bottom. I may make more of these in a variety of sizes with a sheer fabric to use for bulk food (rice, oats, etc). Here's a quick drawstring pouch tutorial.


These zipper pouches will be gifts for some friends. These fabric samples are so pretty and have a nice texture. The reverse side of the fabric is equally pretty so they didn't need to be lined. These were finished with some awesome metal zippers from the 1950's which came in these tiny round plastic containers. .

 Some more basic zipper pouches.....

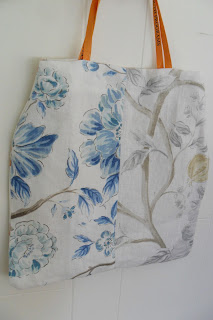
This is a Bag Share bag created from four fabric samples so each side has different fabrics. I made the bag shaped (narrow on top) and used a nylon conference lanyard for the handle.
 Here is the reverse side - such fun!
Here is another tote made with sample upholstery fabric with handles made from a belt I purchased from Good Will for .50. The belt handles are cream on one side and pink on the other which pairs nicely with the soft pink in the rose fabric.

Friday, November 14, 2014

Mini Quilt - Snack Mat
I created this small mug rug for my office so I can eat snacks at work without making too many crumbs. This was a quick project created from two 6" squares of linen that were upcycled from an old shirt. I sandwiched the two pieces (back is a pale apple green color) between a layer of cotton batting. I sewed around the perimeter, leaving a 3" space unsewn, folded the piece right side out, and pushed out the corners. The piece was ironed flat and then topstitched around the edge. 

Each row of stitching was done with 2-4 strands of different colored embroidery thread. I wanted the finished look to be varied and look hand done. The patterns are tree bark like with some wiggles and swirls. 
The overall effect is bumpy and colorful!

Monday, April 7, 2014

Scrap-Tastic!
(small pieced coasters)

Lovely pile of scrap fabrics (I have bins of fabric scraps!)


  Finished Mug Rug

This one has concentric quilting:

Here are a batch of complete coasters - using similar toned fabrics


Gather up your scraps and sort them into piles based on colors you like together. Sew together several small (2-2.5" pieces) in a row. If you want, you can sew together several pieces and then using a rotary cutter, cut the entire sewn piece into two halves.  After each addition, press seams open flat on reverse side, and trim off any loose thread. On average most of my coasters used 5-8 small pieces of fabric. Make sure to back stitch at the start and end of each section you sew together. 

Keep adding scraps until the piece is at least 5" square. It's fine if the pieces are a bit wonky.


Make a second sewn together side out of similar or different fabrics.  Trim it up to 5" square. Place both sides right sides together. Add a 5" square of cotton batting and pin together. 


Put right sides together....

and add the batting layer on the bottom. Pin together. 


Start two thirds of the way down one side, back stitch, then continue to sew around all sides using 1/4" seams. Leave a 2" opening. Turn right side out, pressing to make corners square. Tuck in the opening and iron the entire coaster flat. 


Trim away the excess batting as it adds too much bulk to the finished coaster.


Almost finished!


Top stitch around the outside very close to the outside edge. 


Trim any random threads and you're done! 


This is another set I made with blue, purple, black, and yellow fabrics, adding in a contrast fabric with text leftover from a pre-printed pillow project. 


Thursday, April 4, 2013

It's been so long!

It's been so very long since I've posted on my blog!  Life gets in the way sometimes! I guess working, caring for middle-aged children (8 and almost 10) and working on my Etsy Shop keeps me pretty darn busy. That and buying a 'new' (built in 1886) house last summer has kept us all very busy.

Recently, my husband and I did a superficial bathroom makeover. By that I mean, we didn't replace toilets, sinks and tubs. First up, hubby ripped some holes in the walls to inquire about a pesky ungrounded outlet (that was right next to the sink where there are plenty of wet groping hands reaching for a hand towel)- so a major safety hazard!   As he dug in and found where the wiring went, we figured the bathroom was an add on to the end of the house that most likely used to have a outside door. Once upon a yesteryear, there was a wall switch that turned on an outside light!  So after hubby rewired, and put in new outlets and switches, he patched up all the holes with drywall and compound and it was ready to paint.

BEFORE: white walls, brown trim around window and baseboard. The door and closet louvered door were also dark brown.


AFTER:  Aw, very spa-like, yes?  Love the paint which is Valspar by Lowe's, color is Tranquility.


The LIGHT FIXTURE is from Lowe's and even came with the lightbulbs!  The mirror has to go as it doesn't match so I'll keep my eye out at the second hand shops and or flea market for something I can paint or fix up.

BEFORE: yucky dark door frame leading into the bathoom. I also painted the baseboard in this area, which is our laundry room (washer/dryer to the left).


Painting the bathroom door, which opens into our laundry room made a huge difference.


Side Note:  painting behind a radiator is a major pain in the back side. Usually this can be accomplished the same way you paint behind the toilet. My method is to wrap the toilet and/or radiator in plastic wrap, and use a very small skinny trim paint roller along with an extension to reach way down and behind. Unfortunately the bathroom radiator was too close to the wall so hubby used a giant pair of pliers to loosen the radiator and crank it toward the room (it was disconnected). As you can see in the photo below it's tipped away from the wall and the paint is drying. When it was complete it was moved back into place. Whew!


Here is the louvered closet door which originally had a dirty white plastic knob (yuck)! Plus the thing was filthy so it required quite a bit of scrubbing before I was able to paint.  Also, both the closet door and bathroom door were removed from their hinges and painted flat in a spare room.

BEFORE:


AFTER:  Thank goodness for spray paint!


BEFORE:  Here is the before of the dark wood trim - what a transformation. The room seems so much bigger and fresher.


AFTER:  walls and trim have been painted.


BEFORE: 

AFTER:  The shower curtain is Treshold by Target.


AFTER: Towel bars are Threshold by Target. It's incredible how much of a difference it makes to switch out light switch covers from dingy and yellowed to bright shiny white. Same for the towel bars!


The final AFTER!  

Still need to hang some curtains, a sewing project for another weekend.  I'm thinking of a cafe curtain with appliqued birds.


Wednesday, May 4, 2011

Using up your fabric scraps


If you are anything like me, you hate to throw out perfectly good fabric scraps! I make a lot of similar sized cuts for the projects I typically make, my soft baby toy Jumble Balls. Depending on the size of the fabric, I almost always have a strip of fabric left. I have been saving and using my scraps fairly regularly.

Lavender filled scrap sachet - measures about 4" square.

Recently I have created a few appliqued tree pillows. They have been my most popular items on Flickr and I donated one to my nephew Mitch's school fundraiser and it fetched a nice high price. These are fun to make and I learned about them from the Sew Mama Sew site, specifically from Cluck Cluck Sew.


So far, this autumn themed pillow is hands down my favorite! The colors are wonderful.


The same idea can be used to create other pillows as well, like these two featuring circles and squares.


Another scrap project I created is making these wee sized balsam (or lavender) filled sachets. I use a small ribbon or tiny rickrack for the hanging loop. They are fast and easy to sew up a bunch and would make a lovely wedding favor done all in similar or coordinating fabric.

 You can make all kinds of coasters with very small amounts of fabric. These start out at 5" squares. Of course the most logical thing to do with all my fabric scraps is make a quilt. I have felt intimidated about making a quilt for some time. Maybe because my mother is a fantastic quilt maker and she quilts the tops all by hand. Well, I haven't got the time or the patience for that!

I made this baby quilt for my friend Joanna.  I used a variety of scrap fabric, lots of polka-dots, and loads with little animals - owls, ducks, caterpillars, dogs, birds, etc. Each piece is 5" wide and the length varies - some are 2.5", some 3.5" and others just under 4". I sewed the pieces into 5 strips. The backing is a blue dot minky fleece, which is super soft. The quilt is top stitched and I choose not to put batting in the middle as I didn't want it to be too thick.


For this linen pillow, which was a birthday gift for my friend Mary, I made a bird pattern and a variety of blue and green fabrics.

I plan to make another one of these soon, as I still have a small basket filled with scraps!

What to make with fabric scraps:

Pincushions
fabric covered buttons (which can be made into jewelry, magnets, pushpins, hair ties, etc)
cell phone or ipod case
doll clothes


For very tiny scraps of fabric, button cover projects are great. You can purchase the button cover sets on Etsy and they come in a variety of sizes. They come with either a button backing, which you'd sewn onto clothes, or flat backs that are easy to adhere a variety of clips to. You can attach them to ring and bracelet blanks or adhere the button covers to magnets, paperclips, or hair clips. They are so pretty, I made pushpin and magnet sets for all my coworkers for Christmas this year.