
This tutorial will show you how I make quilted cotton drink coasters. These are relatively quick and easy to make and are an ideal house warming or hostess gift. It’s fun to choose seasonal or special occasion fabric. When complete the coasters are 4” square. For this project I used Henry Alexander's Diamond Eye fabric.
Supplies and materials
One 4 ¾” by 10” piece of fabric for each coaster (yields four 4" coasters)
Natural cotton batting
Cotton thread
Use 1/4-inch seam allowance
- Wash, dry, and iron the fabric.
- Cut fabric: Cut four 4 ¾ inch by 10 inch pieces of fabric (one for each coaster). If you want to make your coasters double-sides, cut four 4 ¾ inch by 5 inch pieces of Fabric A and four of Fabric B.
- Fold each 10” piece of fabric in half the long way, right sides facing (or for double sided, place fabric pieces wrong sides together and sew up 3 sides)
- Assemble coaster: Fold the fabric in half, right sides together, to form a 4 1/2-by-5-inch rectangle. Sew the two 5-inch sides closed so that only one side of the rectangle remains open.
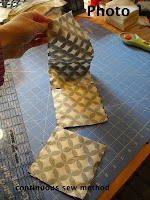
- For faster sewing, use the continuous sew method: instead of sewing each coaster individually, sew the first side of the first coaster, starting with the folded edge going into the machine first. When you complete this first side, and come to the end of the fabric, continue to sew and 1/8th of an inch and then without stopping, insert the edge of the next coaster. When you have sewn all four coaster on one side, then will be connected together like a little chain. Flip them over, and sew up the other sides. When you’re done, just snip the pieces apart. See Photos 1 and 2. This saves a lot of time!


- Trim the corners, but don’t turn them right side out just yet. Iron to set stitches and so the sides are nice and flat.
- Cut four 4” square pieces of cotton batting. Place one square on top of one of the coasters (still wrong side out), then flip both the coaster and the batting, holding them together, right side out. See Photos 4 & 5


- Use a blunt object, like a dull pencil to carefully push the corners square. Then, carefully fold in the extra fabric, covering up the batting, and make sure it measures 4”. A second method is to turn all four coasters right side out, and then tuck the batting smoothly inside the fabric (though the first option is easier). I iron the coasters again at this point, so they are nice and flat.
- Begin quilting about 1/8 inch from the edge on a side neighboring the open edge (you'll close the open edge when you quilt along that side). Sew a few stitches, and then take a couple of backstitches to anchor the quilting. Stitch along the side of the coaster, consistently staying about 1/8 inch from the edge. At the first corner, stop sewing with your needle in the down position. Lift the presser foot, and rotate the coaster 90 degrees; lower the presser foot, and sew to the next corner.
- Repeat stitching along each side and turning the corner as instructed until you're on the fourth side, then stop sewing 1/4 inch before you reach the last corner.
- With your needle in the down position, lift the presser foot, and rotate the coaster 90 degrees; lower the presser foot, and sew 1/4 inch inside the previous stitching line to within 1/4 inch of the next corner. Keep going, following this process until you reach the center of the coaster – backstitch a few stitches and you’re done. Snip away all stray thread, give it one more touch up with the iron, and your done!


Here is a picture of my work space - yup, it's one giant table! There are also shelves up on the wall, and a bureau where I store my fabric. On my work table I have a cutting area, small ironing board, sewing machine, and a bunch of bins where I (try to) organize the different projects I have going on.